Friday, November 22, 2013

Sadie!

 
This is Sadie, our new dog

 
Isn't she downright adorable?

 
She is 12 weeks old,

 
an Australian Blue Heeler,

 
and the newest member of the Saunders animals.

 
She is well loved,

 
by all of us, even Zizzy.

 
Zizzy hasn't quite gotten used to the licking yet,

 
but she will.

 
'Cause Sadie is here

 
to stay!

Monday, November 18, 2013

The beauty of homeschooling

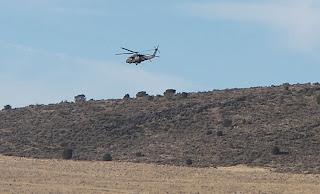
Among the many beauties of homeschooling is the ability to drop everything and follow an interest. After finishing breakfast this morning, the kids were cleaning the kitchen and I was hanging out laundry, when suddenly a huge blackhawk helicopter swooped across our neighbor's field. The kids all ran outside, and we watched as 6 army guys parachuted out of the helicopter, right into the field. Emma ran inside for the camera, and we spent a couple of hours watching what must have been a military parachuting practice. The helicopter took multitudes of army guys up and dropped them in groups of six, over and over and over. It inspired all sorts of questions and learning, from how binoculars work to why the army guys roll when they land. I LOVE learning that is inspired by experience!


Monday, November 11, 2013

Zizzys Birthday- A post by Emma

Lizzy's Birthday cake. Anne made it, doesn't it look so cute? The top is butter-cream roses, the middle is fondant and the bottom is made of fondant too. Well, it's made of cake, and covered with fondant.

 This is Lizzy's Birthday present. Grandma bought it for Lizzy and she had so much fun ripping the paper off of it. 
When Lizzy saw the baby she immediately wanted it out. While 
 we were getting the baby she screamed and cried, she was so excited.
the baby cries, laughs, says mama and baby.

I would like to invite you all to my new blog, EmmaSimpleMusings.blogspot.com. I have to blog my school stuff for our homeschool records, and I'll blog cool stuff, too.

Friday, November 8, 2013

Soap Making

I've taught several friends to make soap, and still have many unfulfilled requests, so here is a soap-making tutorial to learn from, or just be reminded by. The class is far too full of information to be able to assimilate in two hours. Cheryl, Karista, Jessica, Laila, and Laila's daughter are my guests at this class.

Soap making is very simple and fun. You might become addicted to it, like me, and have to start selling your product, or you will end up with a huge box of finished soap in your basement, like mine. I don't know that I will ever, in this lifetime, be able to use all of the soap I have, even with 8 grubby farm children.

 I'm sure you all know that the skin is your largest organ. Everything it contacts is absorbed by your body. That is why you should always start with the best soaping ingredients you can find. I use organic,  non-hydrogenated, preservative/additive free and cold-pressed to preserve the nutritive value. NEVER use vegetable oils other than coconut and olive oil. They are all extremely processed, with additives and preservatives and chemical residues from the processing. Whatever oils you use, your bars will be greatly superior to factory soap, as the factory removes the glycerin to sell as a byproduct, because of its commercial value in other industries. Glycerin is very soothing to your skin and will be retained in your homemade soaps.

Always use stainless steel or glass receptacles and utensils, as lye is very corrosive. Use a food scale to accurately measure your ingredients. This is a wonderful lye calculator to use.

Here is a great, basic recipe to start with. Then, find your favorite oils, learn their sap values, and invent your own recipes. I'll share more of my favorites over time, along with my favortie lotion recipes. This recipe is a small batch of soap, and more easily managed. Plus, you'll try this one and certainly want to immediately try another, with a different essential oil, so small batches will probably be right up your alley.

24 oz olive oil
24 oz coconut oil
38 oz tallow (beef fat)
12 oz lye
32 oz liquid (either milk or water, I use raw goat milk because I have it on hand and it imparts extra skin-nourishing minerals to the soap)

1. Measure oils into a large pan and melt them together over low heat.


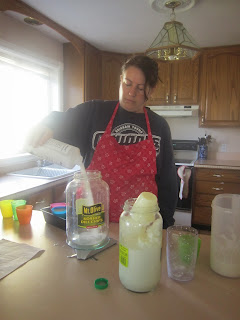
2. Measure your lye into a large glass jar. I like old pickle jars, obviously.:)
3. Add the lye, slowly to the slushy milk. NEVER add the liquid to the lye, it could explode! Having the milk partially frozen helps the chemical reaction to take place more slowly, which keeps your milk from curdling. The milk will turn yellow as the reaction occurs.


4. Get your soap mold ready. I usually just line a shoebox or two with a plastic garbage bag, and staple it into place. You will want your soap to be smooth, so smooth the garbage bag nicely and make tidy hospital corners.

5. Pour the lye/milk mixture very slowly and smoothly (no splashes!) into the oils while your helper gently agitates the oils. Stir gently to expose all of the lye to the oil, allowing saponification to take place. Remember that lye is caustic and be safe.
6. Stir your soap until it "traces." I forgot to take a picture of this step, but it is simple. Occasionally, just lift the utensil out of the soap and let it drip on the top surface. Tracing is when the drips remain visible, instead of just blending back into the mass. Once your soap traces, add several drops of your favorite essential oil, if desired. Then pour the soap into your prepared molds and put them into your cooler for three days. I didn't get a picture of this step easier because my soap had an unusual reaction and I had to panic for a minute. It turned out well, though. You leave the soap in the cooler because the lye takes that long to fully react with all of the oils. It gets hot in that cooler. Don't check, though, just trust me. Leave the heat in and let your soap fully process.
 7. After 3 days, dump your soap out of the shoebox mold and cut it up! The smaller bars in the second picture below were made in a silicone soap mold. I prefer the larger bars, though. We made lavender soap, cranberry soap, and oatmeal, milk & honey soap. Place the soap in an out-of-the way place and let it cure for three weeks. The longer it cures, the better it gets. I have some seven year old bars that last forever, even through my kids' soggy baths, because they have cured so long.


Feel free to leave any questions!

Pumpkin Bread, WAPF-style

WAPF stands for Weston A. Price Foundation. He was a dentist in Chicago about 100 years ago, who learned and shared some age-old nutrition principles that I follow in my own family.

One principle is that grains must be soaked to reduce the phytic acid contained in the hull of the seed. Phytic acid will block absorption of lots of minerals, so consumption of un-soaked whole grains can contribute to cavities and illness. I make everything from scratch, and I soak all of my grains.

Another principle is that modern sugar is devoid of all nutrients, so I use honey, blackstrap molasses, and whole unprocessed natural sweeteners as much as possible. Rapadura is the least processed sugar, for when sugar is unavoidable.

This pumpkin bread is one of our go-to breakfasts in the fall. I make large batches of it and we breakfast off it for several days. It just gets yummier in the fridge. I store it way at the back or the kids would eat it all up!
 Here is my recipe:

Mix:
7 c. freshly-ground whole-wheat flour (the oils go rancid quickly once it's ground)
3 T. baking soda
6 T. pumpkin pie spice

Mix in a very large bowl:
1 1/2 c. raw honey
1 c. coconut oil, melted
5 pastured eggs
8 c. pumpkin puree (or 4 16oz cans)
2 c. raw milk

Add the dry ingredients to the wet ingredients and mix lightly. Put your bowl into a warm oven overnight. I just leave the oven light on, and that keeps the oven warm enough.

Next morning, spoon the batter into greased muffin cups or loaf pans and bake at 350 degrees. Loaf pans will take about 50 minutes, muffins about 35 minutes. A toothpick poked in the center should come out clean.

This recipe makes 4 dozen muffins or  4 loaves of bread. You may want to halve or even quarter it.

Thursday, November 7, 2013

pumpkin cheescake mousse EASY! Five ingredients in four steps!

  My kids have established a new birthday tradition. Instead of birthday cake (we all dislike cake except for Kendel, who loves it) the birthday child gets to choose a special treat. Of course, we still have ice cream with whatever treat is chosen. We all love ice cream!

 This year Caleb chose caramel-covered shortbread. Emma made the shortbread, I made the caramel, and it was delicious! Emma chose pumpkin cheesecake. She decided a whole month before her birthday what she wanted and she really anticipated it.  We knew we would be in and out the day of her birthday between music lessons, classes, and orchestra, so Emma opted to have cheesecake for breakfast instead of dessert. That way, the whole family could participate.

 I totally planned to make the cheesecake the day before her birthday, so it could cool in the refrigerator the requisite number of hours, but the day got away from me and I thought up this delicious, much easier dessert rather than spending my precious sleeping hours baking. I had seen a similar dessert on pinterest. Emma didn't mind and we whipped it up together the morning of her birthday.

Here is how we made our pumpking cheesecake mousse. Keep in mind that we made a very large batch. Our family of ten could only eat half of it.

You will need:
1 quart heavy whipping cream
1 29 oz can pumpkin
2 instant cheesecake boxed mixes
2 8oz boxes cream cheese
pumpkin pie spice
1 stick butter

This is a box on instant cheesecake from WalMart, in case you wondered what I was talking about. Inside are two envelopes, one with graham cracker crumbs for the crust, and one with dry cheesecake filling powder. Mine is 11.2 ounces.


1. Melt butter in a saucepan. Add the crumb package to the butter and mix. Press the crumb mixture into the bottom of a glass or cup, whatever you will be using for your dessert servings. Reserve about a Tablespoon of the crumb mixture to garnish your desserts, if you'd like.

2. Add 3 cups sugar to a quart of heavy whipping cream and whip. Set aside 1 cup of the whipped cream to garnish the finished mousse. This is Emma, whipping the cream.


3. To the remaining whipped cream, add 2 packages of cream cheese, 2 packages of instant cheesecake, can of pumpkin, and 6 Tablespoons pumpkin pie spice. Beat it all together. This is your filling.


4. Spoon the filling into the cups holding the crumb crust. Top with reserved whipped cream, and garnish with a few extra crumbs. Voila! J'ai fait! You could refrigerate it if you wanted to, but we were hungry and couldn't wait.


 Happy Birthday to Emma, and I get the mom of the year award for this breakfast!

  Zizzy's messy self is Proof that this is delicious! It is very rich, and tastes much more "cheesecake-y" than real pumpkin cheescake. We prefer this, and that is saying something, because we love our pumpkin cheescake!

Wednesday, November 6, 2013